viernes, 19 de agosto de 2016


incubadora casera

Esta es una pequeña incubadora casera producto del ingenio de un criador, quien usando la mortada de un pequeño congelador con puerta frontal que obtuvo de un centro de reciclaje, pudo armar su propia incubadora casera, la cual mostramos en este articulo.

La incubadora cuenta ademas con un par de ventiladores de ordenador (12V), un transformador también de ordenador , un motor de microondas de 2.5 rpm., y unas maderas para hacer la bandeja volteadora y la nacedora. Todo ello coste 0.

De la ferretería  un par de porta lamparas, 2 bombillas 40W. y un trozo de tela metálica para las dos bandejas. Coste aprox. 10 Eur.
De internet ( ebay): Termostato 25 Eu. aprox, Higrometro 6 Eu. aprox, programador digital 12 Eur. aprox. 


La incubadora es totalmente automática, la bandeja gira los huevos 6 veces al dia, 1 minuto a la velocidad del motor del microondas ( muy despacio), el ventilador del fondo se pone en marcha cuando lo hacen las bombillas y el del techo funciona constantemente. Bueno, espero que os haya gustado y que os animeis a hacer la vuestra..


Sebright chicken

The Sebright /ˈsbrt/ is a breed of chicken named after its developer, Sir John Saunders Sebright. The Sebright is one of the oldest recorded British 'true' bantam (meaning it is a miniature bird with no corresponding large version of the breed), created in the 19th century through a selective breeding program designed to produce an ornamental breed.[3]
The first poultry breed to have its own specialist club for enthusiasts, Sebrights were admitted to poultry exhibition standards not long after their establishment. Today, they are among the most popular of bantam breeds. Despite their popularity, Sebrights are often difficult to breed, and the inheritance of certain unique characteristics the breed carries has been studied scientifically. As a largely ornamental chicken, they lay tiny, white eggs and are not kept for meat production.

Background[edit]

Sir John Saunders Sebright (1767–1846) was the 7th Sebright Baronet, and a Member of Parliament for Hertfordshire .[4] In addition to breeding chickens, cattle and other animals, Sir John wrote several influential pamphlets on animal keeping and breeding: The Art of Improving the Breeds of Domestic Animals (1809), Observations upon Hawking (1826), and Observations upon the Instinct of Animals(1836).[4]
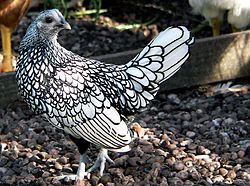
A Silver Sebright hen
Charles Darwin read Sir John's 1809 pamphlet, and was impressed with a passage that elaborated on how "the weak and the unhealthy do not live to propagate their infirmities".[5] These writings, along with Darwin's correspondence via their mutual friendWilliam Yarrell,[6] aided Darwin in the inception of Darwin's theory of natural selection.[5] Darwin's seminal work On the Origin of Species, first published in 1859, cited Sir John's experiments in pigeon breeding,[7] and recalled "That most skilful breeder, Sir John Sebright, used to say, with respect to pigeons, that 'he would produce any given feather in three years, but it would take him six years to obtain head and beak.'"[8] Darwin also cited Sir John extensively regarding the Sebright bantam, as well as pigeon and dog breeding, in his 1868 work Variation of Plants and Animals Under Domestication, his 1871 The Descent of Man, and Selection in Relation to Sex, and his book on Natural Selection (which was not published in his lifetime).[9
Sebright Gold Doré.jpg


Sebright
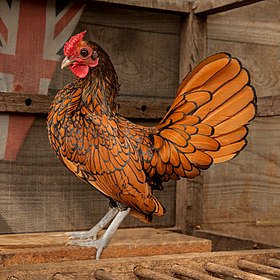
A Golden Sebright rooster.
Conservation statusAt Risk (RBST), Watchlist (RBCSNZ,[1] Endangered (RBTA)[2]
Country of originUnited Kingdom
DistributionWorldwide
UseFancy
Traits
WeightMale:22 oz.
 Female:20 oz.
Egg colorWhite
Comb typeRose
Classification
PCGBTrue Bantam
APSTrue bantam softfeather light breed
Notes
extra notes
Chicken
Gallus gallus domesticus


In accordance with the intentions of their creator, the Sebright is an ornamental bantam, and is commonly seen in competitive poultry shows. As a true bantam, all Sebrights are very small in stature; males weigh an average of 22 ounces (625 grams) and females 20 oz (570 g). Their short backs, proportionally large breasts, and downward–pointing wings combine to create an angular, jaunty look.[13]
Silver Sebright - Standard of Perfection 1905.pngSilver Sebright hen - Standard of Perfection 1905.png
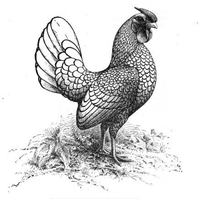
The ideal Silver Sebright male, from The Standard of Perfection
The ideal Silver Sebright female, from
The Standard of Perfection
All Sebrights have plumage that is laced around the edges evenly with black, on a base of either dark gold or whitish silver. Sebrights have unfeathered legs with slate–blue skin, and their beaks are ideally a dark horn color. Sebright roosters carry a rose comb covered with fine points, and a small spike that sweeps back from the head (called a leader). Combs, earlobes and wattles were originally a purple colour referred to in the fancy as mulberry,[14] but today are often bright red though mulberry is still desired according to the standards in most countries.[12] Some breeders consider hen feathering to have an adverse effect on the fertility of male Sebrights, and may use roosters that don't carry the trait for breeding purposes, despite their automatic disqualification in shows.[15]
Characteristically, Sebrights are only one of a few chicken breeds in which the roosters are hen feathered, meaning they have none of the long, sickle–shaped feathers common in most roosters that appear in the tail, neck and saddle. Due to the unique characteristic hen feathering, molecular biologists have found the Sebright bantam a useful model organism in the study of sex hormones.[16] This is because they carry a mutation that causes the tissues of their skin to convert an unusually large amount of male sex hormones (androgens) into female sex hormones (estrogens).[17][18]
They are kind birds but the male Sebright may get protective around hens and may turn on its own owners like all roosters may do. And due to their light, flighty nature it might be best to keep them contained to a smaller, fenced off area. Sebrights often will live happily living amongst other breeds as well. Sebrights are not prolific egglayers and hens are only expected to produce 60-80 creamy-white eggs each season.[3]

Husbandry[edit]

Sebrights are neither prolific egg layers, nor outstanding meat birds. They can prove to be particularly difficult to raise, especially for beginners. Hens rarely go broody and chicks usually have high mortality rates. Adults are generally hardy birds, but are especially susceptible to Marek's disease.[19]
In temperament, Sebrights are friendly and actively social birds. Males are not known to be aggressive, but Sebrights in general, like most small chickens, are somewhat skittish birds. Due to their small size and relatively large wings, they are one of a minority of chicken breeds that retains a strong flying ability. Thus, most keepers keep Sebrights in confinementrather than allowing them to free range.[13] Due to their genetic make-up, males may on occasion be born infertile, further complicating breeding.[3]
A male Serama in its native country of Malaysia

History[edit]

Serama originate in the Malaysian state of Kelantan, apparently through the crossing of Japanese and Malaysian bantams.[1] Other stories of the birds derived from a gift of some small chickens by the King of Thailand to a local sultan in ancient times. Small chickens have always been popular pets in this area and are often referred to as "ayam katik" (pygmy chickens) and "ayam cantik" (pretty chickens).
The modern breed is attributed to the efforts of Wee Yean Een from Kelantan, who named the breed "Serama" after Rama, the title of the Kings of Thailand.[1] The breed was first exhibited in 1990. The breed was hit hard by the Asian bird flu epidemic in 2004 when many birds were culled amid government concerns.
There are no written standards for the breed in its native country. However, they do now have an overall guide on scoring and judging for competitions in Malaysia. Many breeders have a style or type that they breed to, but often breeders keep several "styles". These styles are often names given by breeders to describe a blood line of a champion (e.g. Husin, Mat Awang), but may also be more general shape, characteristics or behaviour (e.g. slim, submarine, and dragon). Hence there is quite a lot of diversity in Malaysia, but an overall theme of a small brave chicken with a persona of fearless warrior or toy soldier. The shape, behaviour, temperament and size of the bird are the most important characteristics. They compete against each other in open table top competitions (often described as "beauty contests") and scored by several judges. The prize for the winning birds can be quite a bit of money.

General characteristics[edit]

The Serama are characterized by their upright posture, full breast, vertical tail feathers held upright and tight up to the body and vertical wings held down nearly touching the ground. In Malaysia they are described as brave warriors and archangel chickens, because of their very human like appearance.
They are the smallest breed of chicken in the world. Typically under 500g, but with even smaller birds that are under 250g being bred in its native Malaysia. However, size alone does not define a Serama. A small chicken without the Serama "type" is not a Serama, but just another small bantam.
The following describes the overall characteristics of "Malaysian type." The Americans and Europeans have defined variants thereof.

Carriage and Temperament[edit]

Assertive with confident bold stance yet calm and manageable. Should be easily handled and show no aggression. The bird should pose readily and when viewed from the side should create a vase like or wide ‘V’ shape outline. They shake their wings and pose, walk with pride, pull their head back to reveal a large chest, lift the legs, and in some styles have neck/head vibrations similar to that of a pigeon.

Body[edit]

The body is well muscled with breast carried high, full and well forward. From above the shape is somewhat elliptical, tapering towards the tail. The body should be short.

Wings[edit]

Fairly large wings in proportion to the body they should be held in a vertical position just clearing the ground and leaving the feet partially visible. Shoulders should be set high on the bird. Primaries are long of medium width with secondaries moderately long and broad.

Tail[edit]

Tail is full and carried high, pointing upwards and held close to the body of the bird with no space between the body and tail. The sickle feathers are relatively straight and spear like. A minimum of one inch longer than the other tail feathers, but ideally no more than a couple of inches above the head is desirable. The remaining tail feathers should ideally be no higher than the top of the comb when the bird is standing to attention. The Main tail feathers should be broad and should over lap neatly. The tail should be open and when viewed from behind should be open to an angle of 45 degrees creating an open ‘V’ shape.

Head[edit]

Head should be small and carried well back. Head is required beyond the level of the feet and held in position of more than 90 degrees from the feet. The single comb is small to medium in size with a minimum of five serrations preferred. The comb should be straight smooth, free of folds or any deformities and tending towards flyaway type. Wattles are to compliment the comb, smaller being preferred and free from folds and wrinkles.

Legs and feet[edit]

The legs are of medium to long length, straight and set wide apart to allow for full and muscular body. They should be strong and stable. Thighs should be of medium length and well muscled with shanks of good thickness. They should not appear soft and weak.

Feathers & Colour[edit]

Like some other Asiatic breeds, they are not colour bred in their native country. Only normal feathered birds are accepted in Malaysia. Feathers held tight against the body and should not be long or flowing.
Silkied feathered birds are accepted in America and much of Europe. The silkied gene was believed to be carried by some birds imported from Malaysia.
Other mutations (e.g. frizzled, rumpless and booted) have been introduced in America and some parts of Europe by crossing to other breeds.They can have a range of varieties in color and structure.

Caracteristicas Sedosas del Japón

Raza muy antigua y que proviene de Asia

De todos es conocido que esta especie es de lo mas singular y llamativa.
Su plumaje esponjoso que  recuerda mas a un gato de angora que a una gallina es lo que determina su nombre como sedosas, existiendo una gran variedad de colorido y capas.
Las sedosas se han utilizado en china con fines medicinales desde hace muchos años ya que bajo su creencia la carne negra de este animal y los huevos poseen propiedades curativas.

Aunque existen otras razas con esta característica , la sedosas de Japón ha de tener cinco dedos en las patas para considerarse totalmente perfectas.

Otra curiosidad en esta gallina es el color azulado intenso en las orejillas y una cresta muy singular en los machos en forma de nuez de color granate.
 
   
Dentro de la misma especie existen las sedosas con barba y las sedosas sin barba.


Las hembras a diferencia de los machos poseen un copete muy poblado y  algunas nacen con una protuberancia en la cabeza que las distingue claramente.


Para distinguir el sexo de los pollitos recién nacidos existen diferentes formas
Una ya la he mencionado y otras serian las siguientes aunque no resulta fácil y a veces puede llevar a equívocos aunque a mi me suelen funcionar bastante bien.

Cuerpo mucho mas redondeado en las hembras y con una línea semi circular al final del cuerpo
que en los machos es mucho mas recta.
En estas imágenes también se aprecia la diferencia de las plumas de las alas entre el macho y la hembra
Otra opción es palpar el ancho de las caderas que en el caso de las hembras es siempre mas ancho y terminando en pico en los machos.
 
Las plumas secundarias siempre son mas cortas que las primarias en las hembras y en los machos suelen del  mismo tamaño o mas cortas las primarias.


Las sedosas del Japón son unas excelentes madres que incuban sin ningún problema y dado su pelaje tienen bastante capacidad de abarcar huevos, por si solas
son capaces de abarcar a la perfección mas de diez huevos

Los gallos de esta especie son muy buenos padres y es fácil verles estimulando a los pequeños polluelos para que aprendan a comer y escarbar ante su llamada.

La variedad rizada es igual de llamativa y esponjosa que la propia raza y tienen las mismas características que las anteriores a excepción de sus plumas rizadas.

Espero que si os animáis a tener esta raza de gallina sepáis disfrutarlas tanto como yo lo hago y que esta información resumida os sea de la mejor ayuda posible.

jueves, 30 de abril de 2015

¿Cómo hacer una incubadora casera?

INCUBADORA DE HUEVOS CASERA 

En este proyecto podrás construir tu propia incubadora de huevos totalmente casera utilizando materiales que se pueden compran en cualquier ferretería o chatarrería. 
¿Cómo hacer una incubadora casera? 

Nota: ESTA INCUBADORA ESTA DISEÑADA PARA HUEVOS DE GALLINA PERO DEPENDIENDO DE LAS CARACTERISTICAS DE LAS OTRAS ESPECIES SE PUEDE ADAPTAR PARA OTRO TIPO DE HUEVOS COMO AVES, REPTILES U OTRO ANIMAL. 
Primero comencemos con el concepto de incubación para después ir de lleno al armado de la incubadora. 

El concepto de incubación 

Bueno para no alargar mucho este tema les dejo a continuación un archivo con una guía de incubación muy buena 

Ver guía de incubación (PDF) 

ES MUY IMPORTANTE LEER LA GUIA DE INCUBACION ANTES DE METER LOS HUEVOS PUESTO QUE AHÍ SE INDICAN TODOS LOS PASOS A SEGUIR PARA NO TENER QUE SACAR HUEVOS HUEROS O POLLITOS MUERTOS. 

Materiales para armar la incubadora 


2 cortes de madera de 41,5cm X 19,5cm (para las tapas delantera y trasera) 
gallinas 

2 cortes de madera de 56cm X 19,5cm (para las caras laterales de la incubadora) 

A estos 2 cortes de madera debes hacerle unas perforaciones cada 5 cm del porte de un lápiz para que exista ventilación dentro de la incubadora 
temperatura 
2 cortes de madera de 56cm X 40cm para la base y el techo (el corte de la base puede ser mas grueso para tener una superficie más firme donde armar la incubadora 
casera 
1 o 2 rejilla para colocar los huevos y que puedan ser volteados con facilidad 
Incubadora 
1 corte de acrílico transparente o vidrio de 34cm X 10cm (esto servirá como ventana para ver el interior de la incubadora y también será una puerta para voltear los huevos) 
¿Cómo hacer una incubadora casera? 

Herramientas 

Taladro 

Sierra o serrucho eléctrico 

Escuadra 

Martillo 

Tornillos para madera 

Atornillador


Manos a la obra!! 

Lo primero que debes hacer es clavar atornillar o unir las 2 esquinas 
gallinas 
Luego unir estos 2 trozos en uno solo formando un cuadrado sin base ni techo 

Luego montarlo sobre la base de la incubadora 

Te debería quedar algo así: 
temperatura 
Clavar para que quede bien firme (fíjate muy bien que no exista separación entre las piezas porque por ahí se pierde mucho calor). 

Si existe puedes utilizar silicona o algún sellador para parar eso. 

Cuando esté bien fijado debes poner unos palitos acostados para darle altura a la rejilla 
casera 
Debe quedar elevada por lo menos a unos 3 cm de la base 

Esto es para colocar un plato o un recipiente con agua debajo de la rejilla (esto es para mantener la humedad y el cascaron se ablande al momento de nacer el pollito 
Incubadora 
Luego realizas un corte en la tapa delantera para instalar el acrílico 
¿Cómo hacer una incubadora casera? 
Después pones la tapa superior en la incubadora pero NO LA CLAVES primero hay que realizar la instalación del ventilador y demás... 
gallinas 
temperatura 

AHORA ESTA LISTA LA BASE DE LA INCUBADORA 

AHORA COMENZAMOS LA INSTALACION ELECTRICA 


Para realizar la instalación necesitas los siguientes materiales 

2 Ventiladores de una fuente de poder de PC de 12vdc o de procesador pero son más pequeños así que no los recomiendo. 

Termostato en buen estado de una plancha 
casera 
2 transformadores para los 2 ventiladores 12vdc 

Un portalámparas 

Una ampolleta de 100 w para generar el calor suficiente dentro de la incubadora 

Cinta aisladora 

Alicate universal 

3mt de cable o cordón de 3 líneas 

CUANDO TENGAS TODOS LOS MATERIALES DISEÑA EL CIRCUITO ELECTRICO 

Incubadora 

El primer ventilador lo debes colocar en la parte superior de la ventana 
¿Cómo hacer una incubadora casera? 

El segundo debe estar atrás apuntando el flujo de aire hacia la ampolleta 
Esto es para que haya una buena circulación de aire caliente 
gallinas 
El termostato debe estar a 5cm de la ampolleta y la ampolleta debe estar en el centro del techo de la incubadora 
temperatura 
Bien como ya tienes lo principal instalado ahora tienes que CREAR Y PROBAR EL CICLO DE INCUBACION 

Yo primero hice la incubadora con un calefactor de plancha 

No resulto porque la plancha quemo la madera 

Después utilice una ampolleta y así funciono correctamente 

Recuerda que esta es solo una guía y no un manual paso a paso si no tienes un material puedes buscar un reemplazante que no influya demasiado en el resultado final 

Bien ahora creemos el ciclo de incubación 

Como ya habrás leído en la guía de incubación 

Dependiendo del animal que incubes tendrás que variar la temperatura y los cuidados de estos al nacer 

En este caso los huevos de gallina tienes estas características: 

Dias de incubación: aprox. 21- 24 

El nivel máximo de tolerancia debe ser de 38 º C 

El nivel mínimo de tolerancia debe ser de 37 º C 

Esta temperatura es relativa 

Todos los manuales o tutoriales que encuentres en internet nunca se podrán de acuerdo en las temperaturas y los dias de incubación 

Generalmente no son muy distintos así que no te compliques con esto. 

Primero debes probar el ciclo de incubación por 2 dias seguidos e ir a una cierta hora del día y anotar la temperatura para tener un registro 

Esto sirve para ajustar el termostato a la temperatura correcta 

Bien como ya probaste el ciclo de incubación es hora de que pongas los huevos en la incubadora 

La primera crianza deben ser pocos para tener un mayor control de estos 

Te recomiendo que le hagas una línea con un lápiz mina para que sepas cuando esta volteado y cuando no 
casera 
Bien aquí comienza el trabajo de cuidados 


Muy importante es que siempre le tengas agua en el recipiente para que la humedad se conserve dentro de la incubadora 

Como ya tienes marcados los huevos debes dejarlos todos en una posición para poder girarlos todos al mismo tiempo y en la misma dirección 

Con la información que yo tengo puedo decir que deben ser más o menos 90 grados de inclinación 2 veces al día de izquierda a derecha 

Yo lo hacía a las 12 y a las 6 de la tarde 

Para tener un orden en la rotación de los huevos 

Los huevos se giran para que el embrión quede en el centro del huevo en una buena posición para desarrollarse y así no se aplaste en una de las paredes del huevo 

Como dice en el manual el volteo se realiza los primeros 18- 20 dias para que se desarrolle en embrión 

Luego se deja en una posición en la que la bolsa de aire quede arriba para que pueda respirar 

Ahora comenzamos a fabricar la nacedora 

Nacedora de pollitos 


Esto es el lugar donde terminan de nacer nuestros pollitos y se mantienen los primeros 15 dias de vida 

Esto es mucho más sencillo que la incubadora pues es solo un termostato que regula la temperatura y una fuente de calor 

Básicamente es el mismo proceso de la incubadora 

Armas una caja de madera la diferencia es que esta debe ser hermética (obviamente con ventilación) 

Tener una fuente de calor (pude ser una ampolleta de 100W pero si la vas a utilizar te recomiendo que le pongas una tela antes de la base para que los pollitos sepan cuando es de día y de noche o si no se desorientan se debilitan y se mueren. 
Incubadora¿Cómo hacer una incubadora casera? 

Además le debes agregar un bebedero de agua y alimento 

Aquí debes tenerlo los primeros 15 dias o hasta que estén fuertes para ponerlos en el exterior o en una jaula con menos protecciones contra el frio 

Recuerda que el frio es el peor enemigo de los pollitos 
gallinastemperatura 

Espero que les haya sido de utilidad esta guía para hacer una incubadora